I'm so excited that I've been choosed as the Design Team Coordinator at scrapthemoments.blogspot.com!!! This is a challenge blog, started by Devon Hickman. Devon also has a kit site, catchthemomentskits.blogspot.com where you can purchase some pretty scrapbook kits! I cannot wait to start working on some of the challenges on this new blog. And I'm REALLY excited that I get to assist in the organization/coordination of the other design team members and their projects! If you want to get inspired by some great challenges, come on over and follow scrapthemoments.blogspot.com!
Thursday, November 18, 2010

Friday, November 5, 2010
Thanksgiving Journaling Prompts
Journaling is VERY important for me in my scrapbooking. Below is a compilation of Thanksgiving Journaling Prompts that I have collected from various websites*.
A few exercises to get you started...
Words to inspire thankful thoughts- Choose one word (or a group of words) from the list below and write freely about what they personally mean to you.
Get everyone involved-Ask everyone to write down their name and one thing they are thankful for this year. You can pre-cut the papers to be any size you would like, so you can include them on a scrapbook page. BONUS--You will have a sample of everyone's handwriting in your scrapbook!!!

Journaling Prompts...

*I used the following web sites to compile the journaling prompts on this list...
http://www.creativity-portal.com/prompts/dunmire/thanksgiving.html
http://www.scrapvillage.com/blog/2008/11/journaling-prompts/
http://k6educators.about.com/od/novemberholidayslessons/qt/thanksjournal.htm
http://journaljots.blogspot.com/2008/11/thanksgiving-journal-prompts.html
I hope these will jump-start your Thanksgiving journaling for your scrapbook layouts! Happy Thanksgiving!
A few exercises to get you started...
Words to inspire thankful thoughts- Choose one word (or a group of words) from the list below and write freely about what they personally mean to you.
Thankfulness, gratitude, abundance, warmth, security, family, football, tradition, November, Harvest Festival, fourth Thursday in November, Macy's Thanksgiving Parade, Thanksgiving Proclamation, George Washington, 1789, Pilgrims, settlers, Indians, fall, autumn, feast, turkey, gravy, dressing, stuffing, corn, yams with marshmallows, pumpkin pie, mashed potatoes, sweet potatoes, turnips, cranberry sauce, corn bread, Christmas shopping.Thankful list- If you want to prepare yourself for Thanksgiving, you could always write out 100 Things You Are Thankful For. It's not as easy as you might think to come up with 100 different things.
Get everyone involved-Ask everyone to write down their name and one thing they are thankful for this year. You can pre-cut the papers to be any size you would like, so you can include them on a scrapbook page. BONUS--You will have a sample of everyone's handwriting in your scrapbook!!!

Journaling Prompts...
- Record your child’s version of Thanksgiving on a scrapbook page.
- Make a list of your family’s favorite Thanksgiving Traditions.
- Does your family say a special Thanksgiving prayer at mealtime? Record the words.
- Create a “menu” that documents your family’s Thanksgiving meal.
- Write a guest list of the people who attended your Thanksgiving feast this year. (Wouldn’t it be cool if you did this every year?)
- Include a copy of your Thanksgiving shopping list on a scrapbook page. (I think it would be neat to include the receipt too.)
- Photocopy favorite family Thanksgiving recipes and slip them behind or on a scrapbook page.
- Tell about a Thanksgiving that went awry. Did you burn the mashed potatoes? Did your son come down with the chicken pox?
- What is the one thing you like best about Thanksgiving Day?
- How have you changed the Thanksgiving traditions of your childhood? If you’re married, how have you melded traditions from two families?
- Where did you go for Thanksgiving dinner this year? Were you happy to go there?
- Create a schedule that shows your Thanksgiving routine.
- What do you do with Thanksgiving leftovers?
- Make a list of Thanksgiving Day movies and/or books you and your family enjoy.
- What does it mean to be thankful?
- Why do you think brown and orange are the Thanksgiving colors?
- Describe what you know about the first Thanksgiving dinner.
- Use your five senses to describe the meal's tastes, looks, smells, and textures.
- Tell about your family's Thanksgiving traditions. How does each person contribute?
- If Thanksgiving is one of your favorite holidays, describe why you enjoy it so much. Are there any parts of the holiday that you don't like?
- What family traditions are you looking forward to this Thanksgiving?
- What family traditions are you hoping to avoid this Thanksgiving?
- Are there any special family recipes that you use for Thanksgiving?
- Who will be at your Thanksgiving feast this year? Are there any new additions? Anyone missing?
- What activities does your family participate in while they're waiting for dinner?
- Do you use the good china or the paper stuff?
- Do you create anything "crafty" for Thanksgiving? (centerpieces, flower arrangements, place markers, or napkin rings, or example)

- Who prepares the meal?
- Did you make any culinary contributions to the meal?
- Write out the menu and who prepared what.
- What was your favorite dish? Least favorite?
- Where does everyone sit for dinner?
- Were there any interesting conversations during dinner?
- Write about dessert.
- Who cleans up the mess?
- What activities did your family participate in after dinner?
- What was your favorite memory of this Thanksgiving?
- Compare the Thanksgivings of your childhood to the Thanksgivings of your adult life.
- What was different about Thanksgiving this year?
- Do you think the history of Thanksgiving Day matters to people anymore? Is the current meaning of a holiday celebration or family tradition more important than its roots?
- What does celebrating Thanksgiving represent or symbolize to you?
- Does your family gather together at Thanksgiving? If so, do members travel great distances and put a lot of effort to get together and make the event memorable? What do you enjoy about this event?
- How does Thanksgiving Day normally go at your house? Does it go smoothly or is it a time of family stress or disagreement?
- Do you watch football games on Thanksgiving Day? What have been the most memorable Thanksgiving football games that you remember?
- Do you remember celebrating your first Thanksgiving dinner with your family? How old were you? Who did you sit next to? What else do you remember about it?
- Do you remember preparing your first Thanksgiving dinner for your family? What was the experience like? Was the turkey dry? Or did everything turn out perfect?
- Is Thanksgiving a time for "thanks" and "gratitude" for you? Or are you primarily focused on preparing a meal or entertaining guests?
- Do you look forward to the "biggest shopping day of the year" kicking off your Christmas shopping on Black Friday (the day after Thanksgiving)? How do you prepare for it? (Include gift/shopping lists and an itinerary.)
*I used the following web sites to compile the journaling prompts on this list...
http://www.creativity-portal.com/prompts/dunmire/thanksgiving.html
http://www.scrapvillage.com/blog/2008/11/journaling-prompts/
http://k6educators.about.com/od/novemberholidayslessons/qt/thanksjournal.htm
http://journaljots.blogspot.com/2008/11/thanksgiving-journal-prompts.html
I hope these will jump-start your Thanksgiving journaling for your scrapbook layouts! Happy Thanksgiving!
Tuesday, November 2, 2010
Organizing Photos---From the Camera to the Completed Layout (and everything in between)
In this age of digital photography...it is possible to have dozens, or even 100's of photos of any given event. I have taken 1000's of pictures this year alone!!! Will I scrap all of these pictures?...of course not! But every single one of these photos is organized...and once I found a system that worked for me...it became a breeze to keep up with it!
The most important thing to remember (I believe) is that your should not rely only on the hard drive of your computer for preserving your pictures. Computers crash...every day. And if you do not have your photos backed up, you will loose them all. These are the steps I follow with my photos, from the moment they are taken, until the moment they are scrapped.
STEP 1:
Download onto computer.
I download my pictures to my hard drive. I create a folder for each year. In each of these "year" folders, there is a sub-folder for each month. Next, I crop and edit them to my liking.

STEP 2:
Make backup files.
I cannot stress the importance of this step enough! I send all of my pictures to an on-line processing site. I use http://www.snapfish.com/ ...but there are many on-line photo-sharing sites to choose from. I also make a second back up in the form of a CD or DVD and label it for the appropriate year and month. I know these discs will not last forever. I believe it is recommended to re-save them every few years. Once I make the back-ups, I am comfortable with deleting the photos from my memory card.
STEP 3:
Decided which photos to print.
I go through each month's pictures, and view the photos rather quickly. I make 2 lists...one for photos I want to print as 4x6 prints, and one for photos I want to print as wallets (2"x3" mini prints). If I go through the pictures quickly, I am forced to choose only the best photos to make large, and the next best to be made as "supporting" mini prints.
I do not take my time, or sit and debate back and forth whether or not to print a picture, if I have to debate...it is probably not a very good picture, and I know I should not print it. I just keep track of the BEST pictures on my two lists. I usually end up printing about 1/10 of the photos I have taken.
STEP 4:
Get the pictures printed.
I print all of my 4x6 prints at http://www.snapfish.com/ because it is inexpensive (9 cents each) and there is usually some type of coupon or sale. I look for deals on free shipping or "50 free print" specials and try to place orders when I have these types of coupons/coupon codes.
I print the mini prints in the 1-hour processing center at Target. I use the Kodak Kiosk at Target to organize and place my order. I wait until I have enough pictures to make 100 4x6 prints (400 mini prints)...then I get a cheaper cost per print. I believe it is 15 cents per print for an order of 100 prints or more. When printing the mini prints...you must go to "collages", then "mini prints", then choose the size (2 3x4", 4-2x3", or 9-1 1/2 x1"), then choose the pictures. Each image on the 4x6 sheet is a DIFFERENT picture---I cut them apart when I get home. By printing mini prints (2"x3" size) I get 400 photos for $15.00. This also allows me to scrapbook more pictures on a layout.
Once I have the prints in my possession, I feel comfortable deleting the pictures from my hard drive. If I had an external hard-drive, I would keep them saved there (as an additional form of back-up)...but I do not have an external drive.
STEP 5:
Organizing the prints.
Once I have the prints, I divide them up into the appropriate grouping for the layouts I plan on creating. for example, if I have 50 pictures of Christmas, I might make 5 different layouts...one for Christmas Eve, one for opening gifts, one for Christmas dinner, one for Christmas gifts at Grammy's house, and one for "playing with gifts". I divide my prints into piles that correspond with each layout. Next, I put each pile into it's appropriate page protector in the album.
**I organize my albums chronologically, so it is easy to tell which page protector will house each completed layout. To help me keep track, I create a "Table of Contents" for each album. The "Table of Contents" is nothing more than a piece of scrap paper placed inside the front cover of each incomplete album. I list the layouts I plan on including in that album and cross each one off as it is completely scrapped. Once I finish an entire album, I throw the "Table of Contents" away.
STEP 6:
Add the coordinating paper and embellishments.
Once I have the pictures divided into layouts, I choose matching paper and embellishments for the layout. I slip in my journaling notecard into the page protector (see my post about Journaling Tips for more information). I slide the coordinating paper behind the pictures in each page protector. If there are coordinating embellishments, or memorabilia, I will include them in the page protector as well. (See my post on Managing Memorabilia for tips on keeping track of and organizing your memorabilia.)


STEP 7:
Scrapbook that page!
Now the pictures, paper, memorabilia, journaling, and main embellishments are all in one place, ready to be scrapbooked. I do not work in chronological order. I usually just thumb through an album, pick a layout that inspires me...and work on that. Half of the work is already done for me. All I have to do is design the elements, add the title, and grab a few other embellishments (like ribbon, buttons, or flowers) and finish off the page.
This may sound somewhat time consuming, but I feel that it is saving me time in the long run. Everything is completely organized and when I have time to dedicate to scrapbooking, I am not scrambling around searching for pictures on the computer, or sifting through boxes of printed pictures. I already have the pictures and paper chosen and I am ready to get some serious scrapping done!!! I hope that some of these ideas will help you in organizing, printing, and scrapping your photos!!!
The most important thing to remember (I believe) is that your should not rely only on the hard drive of your computer for preserving your pictures. Computers crash...every day. And if you do not have your photos backed up, you will loose them all. These are the steps I follow with my photos, from the moment they are taken, until the moment they are scrapped.
STEP 1:
Download onto computer.
I download my pictures to my hard drive. I create a folder for each year. In each of these "year" folders, there is a sub-folder for each month. Next, I crop and edit them to my liking.

STEP 2:
Make backup files.
I cannot stress the importance of this step enough! I send all of my pictures to an on-line processing site. I use http://www.snapfish.com/ ...but there are many on-line photo-sharing sites to choose from. I also make a second back up in the form of a CD or DVD and label it for the appropriate year and month. I know these discs will not last forever. I believe it is recommended to re-save them every few years. Once I make the back-ups, I am comfortable with deleting the photos from my memory card.
STEP 3:
Decided which photos to print.
I go through each month's pictures, and view the photos rather quickly. I make 2 lists...one for photos I want to print as 4x6 prints, and one for photos I want to print as wallets (2"x3" mini prints). If I go through the pictures quickly, I am forced to choose only the best photos to make large, and the next best to be made as "supporting" mini prints.
I do not take my time, or sit and debate back and forth whether or not to print a picture, if I have to debate...it is probably not a very good picture, and I know I should not print it. I just keep track of the BEST pictures on my two lists. I usually end up printing about 1/10 of the photos I have taken.
STEP 4:
Get the pictures printed.
I print all of my 4x6 prints at http://www.snapfish.com/ because it is inexpensive (9 cents each) and there is usually some type of coupon or sale. I look for deals on free shipping or "50 free print" specials and try to place orders when I have these types of coupons/coupon codes.
I print the mini prints in the 1-hour processing center at Target. I use the Kodak Kiosk at Target to organize and place my order. I wait until I have enough pictures to make 100 4x6 prints (400 mini prints)...then I get a cheaper cost per print. I believe it is 15 cents per print for an order of 100 prints or more. When printing the mini prints...you must go to "collages", then "mini prints", then choose the size (2 3x4", 4-2x3", or 9-1 1/2 x1"), then choose the pictures. Each image on the 4x6 sheet is a DIFFERENT picture---I cut them apart when I get home. By printing mini prints (2"x3" size) I get 400 photos for $15.00. This also allows me to scrapbook more pictures on a layout.
Once I have the prints in my possession, I feel comfortable deleting the pictures from my hard drive. If I had an external hard-drive, I would keep them saved there (as an additional form of back-up)...but I do not have an external drive.
STEP 5:
Organizing the prints.
Once I have the prints, I divide them up into the appropriate grouping for the layouts I plan on creating. for example, if I have 50 pictures of Christmas, I might make 5 different layouts...one for Christmas Eve, one for opening gifts, one for Christmas dinner, one for Christmas gifts at Grammy's house, and one for "playing with gifts". I divide my prints into piles that correspond with each layout. Next, I put each pile into it's appropriate page protector in the album.
**I organize my albums chronologically, so it is easy to tell which page protector will house each completed layout. To help me keep track, I create a "Table of Contents" for each album. The "Table of Contents" is nothing more than a piece of scrap paper placed inside the front cover of each incomplete album. I list the layouts I plan on including in that album and cross each one off as it is completely scrapped. Once I finish an entire album, I throw the "Table of Contents" away.
 |
| Sample "Table of Contents" |
STEP 6:
Add the coordinating paper and embellishments.
Once I have the pictures divided into layouts, I choose matching paper and embellishments for the layout. I slip in my journaling notecard into the page protector (see my post about Journaling Tips for more information). I slide the coordinating paper behind the pictures in each page protector. If there are coordinating embellishments, or memorabilia, I will include them in the page protector as well. (See my post on Managing Memorabilia for tips on keeping track of and organizing your memorabilia.)


STEP 7:
Scrapbook that page!
Now the pictures, paper, memorabilia, journaling, and main embellishments are all in one place, ready to be scrapbooked. I do not work in chronological order. I usually just thumb through an album, pick a layout that inspires me...and work on that. Half of the work is already done for me. All I have to do is design the elements, add the title, and grab a few other embellishments (like ribbon, buttons, or flowers) and finish off the page.
This may sound somewhat time consuming, but I feel that it is saving me time in the long run. Everything is completely organized and when I have time to dedicate to scrapbooking, I am not scrambling around searching for pictures on the computer, or sifting through boxes of printed pictures. I already have the pictures and paper chosen and I am ready to get some serious scrapping done!!! I hope that some of these ideas will help you in organizing, printing, and scrapping your photos!!!
Wednesday, October 27, 2010
Halloween "BOO" Banner and Instructions
A friend of mine got me motivated to try to create a Halloween banner. Here is what I/we came up with...


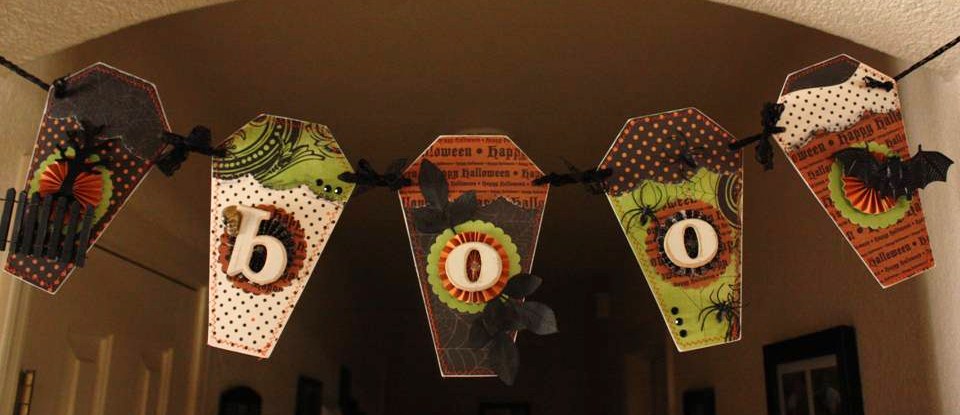

HOW TO:
- I used an old tag-shaped idea book from JoAnn's (each page was a chipboard tag) as the base of each coffin...I cut off the bottom corners so they would look like little coffins, rather than the standard triangle pendants used in many banners.
- Next, I covered them with patterned paper. These papers were not all from the same line, or even the same company. I believe some of the papers I used were DCWV paper stacks from last fall, DCWV stack from this fall, and Making Memories.

- I used a scalloped border punch to punch the scallop design that runs across the top portion of each coffin. I used a 2 1/2 inch scalloped circle punch to get the scallop under each medallion.

- I zig-zag machine stitched all the way around each coffin, to ensure the papers won't peel off and the banner will hold up!
- I also gently filed the edges of each coffin with a nail file. It gives the edges a "finished", distressed look.

- Next, I created the cute paper medallions for the center of each coffin. Here is a link to learn how to make these medallions (sometimes called rosettes) http://www.pinkpersimmon.com/tutorial_rosettes.html

- Finally, the most FUN part...embellishing each coffin!!! I collected random bits and pieces of Halloween decorations and craft supplies from around my house. I had to spray paint a few of the items black (like the floral leaves and the white picket fence). I used chipboard letters to spell "boo". I cut the "ring" off of those plastic spider rings, and used the spiders on one coffin. I included a little plastic skull and a felt tree silhouette. I added a plastic bat and some black bling here and there to finish them off. You can really use your creativity and imagination to come up with some great dimensional embellishments to add to your banner. This was definitely my favorite part!!! I used hot glue and Eileen's Tacky Glue to adhere everything.

- Last, I punched holes where I wanted to string the lace, tied the lace into bows, and hung the banner across the hall entrance.

The best part, I didn't have to spend any money on this project...everything came from my scrapbook stash and Halloween decoration stash!!! Have fun creating!
Friday, October 22, 2010
My FAVORITE Photo Editing Site
My favorite photo editing website is http://www.picnik.com/ . This is the site I go to in order to do more than just the basic "crop" and "red-eye reduction" type editing. I only send a handful of photos here to be edited. The basic membership is free, the upgraded membership is about $25 a year. The free membership offers a HUGE variety of edits by itself.
Lots of editing options:
The editing procedures are very simple to use. There are many editing options to choose from, and various attributes under each type of effect that allow you to adjust values, colors, strength of edits, etc.
For example, if you choose to make the photo "Black and White"...you also have the following options...
Have some fun and give it a try:
There is no program to download to your computer...instead you upload your pictures to their site, edit them, then save the edited pictures back to your computer. (From there you can send them where ever you want to get them developed, save them on a disc, or archive them however you like.)
What I will suggest is visit the website, upload a picture, then start playing! There are so many awesome edits available. It is also very simple to use. My favorite section is the "Create" tab then the "Effects" drop down menu.
I hope you give it a try...I know you'll be glad you did!!!
Presently, I have the basic (free) membership...here are some of my recent Halloween Edits...




Lots of editing options:
The editing procedures are very simple to use. There are many editing options to choose from, and various attributes under each type of effect that allow you to adjust values, colors, strength of edits, etc.
For example, if you choose to make the photo "Black and White"...you also have the following options...
- color filter (you choose from 1000's of color variations and gradients)
- % fade (from 0-100%)
- select areas of the picture to remain in color
- the strength of the "color" areas (from 0-100%)
- size (from 0-100)
- strength of color (0-100%)
- the vignette color (once again, 1000's of color variations and gradients)
- and the fade (from 0-100%)
Have some fun and give it a try:
There is no program to download to your computer...instead you upload your pictures to their site, edit them, then save the edited pictures back to your computer. (From there you can send them where ever you want to get them developed, save them on a disc, or archive them however you like.)
What I will suggest is visit the website, upload a picture, then start playing! There are so many awesome edits available. It is also very simple to use. My favorite section is the "Create" tab then the "Effects" drop down menu.
I hope you give it a try...I know you'll be glad you did!!!
Presently, I have the basic (free) membership...here are some of my recent Halloween Edits...


I hope you will give it a try...I promise you'll be glad you did!!!
Thursday, October 7, 2010
Halloween Photo and Journaling Opportunities
Photo Opportunities
Halloween presents us with tons of photography opportunities...below is a list I have compiled so I don't miss any of the important activities!
Choosing a Costume
Making a Costume
Decorating the Indoors
Decorating the Outdoors
House Lit Up at Night
Detail Shots of Decorations
Haunted House Adventures
Pumpkin Patch Adventures
Cornstalk Maze
Choosing a Pumpkin
School Halloween Functions
Getting Dressed
Getting Make Up Applied
Costume Details
Picture of Each Child in Costume
Trick or Treating (group and individual shots)
Knocking on the Door
Opening the Bag for Treats
Scary Movie Night
Passing Out Candy
Bag of Treats at the end of Trick or Treating
Neighborhood decorations
Family Members in Costume
Scooping out Pumpkin Guts
Carving the Pumpkin
Completed Jack-O-Lantern
Cooking Pumpkin Seeds
Eating Pumpkin Seeds
Halloween Parties
Bobbing for Apples
Group Party Picture
Hay Ride
Carmel Apples
Changing/falling leaves
Pets in their costumes
Costume Parade
Photography Tips
Here are a few links to sites that give some great tips for Photographing Halloween. There are tips from everything from costumes, to Jack-O-Lanterns, to decorations.
http://photography.about.com/od/halloweenphotography/ss/HallowPhototips.htm
http://www.digital-photography-school.com/halloween-photography-tips
http://www.associatedcontent.com/article/2149521/ten_halloween_photography_tips.html
Journaling Opportunities
Now for the journaling...Besides the typical Who? What? When? Why? and Where? answers, try to make your Halloween journaling a little more interesting...here are some journaling prompts to get you started...
Interview each child as soon as you are done Trick or Treating, the day's events will be fresh in their mind. Some questions to include could be...
What was your favorite part of Halloween?
What was the scariest part of Halloween?
What is your favorite treat or candy?
What do you think you want to be next year for Halloween?
I'm still brainstorming more interview questions, if you can think of any, leave a comment and I'll add the to the blog post!
Have fun with you Halloween layouts!!!
Halloween presents us with tons of photography opportunities...below is a list I have compiled so I don't miss any of the important activities!
Choosing a Costume
Making a Costume
Decorating the Indoors
Decorating the Outdoors
House Lit Up at Night
Detail Shots of Decorations
Haunted House Adventures
Pumpkin Patch Adventures
Cornstalk Maze
Choosing a Pumpkin
School Halloween Functions
Getting Dressed
Getting Make Up Applied
Costume Details
Picture of Each Child in Costume
Trick or Treating (group and individual shots)
Knocking on the Door
Opening the Bag for Treats
Scary Movie Night
Passing Out Candy
Bag of Treats at the end of Trick or Treating
Neighborhood decorations
Family Members in Costume
Scooping out Pumpkin Guts
Carving the Pumpkin
Completed Jack-O-Lantern
Cooking Pumpkin Seeds
Eating Pumpkin Seeds
Halloween Parties
Bobbing for Apples
Group Party Picture
Hay Ride
Carmel Apples
Changing/falling leaves
Pets in their costumes
Costume Parade
Photography Tips
Here are a few links to sites that give some great tips for Photographing Halloween. There are tips from everything from costumes, to Jack-O-Lanterns, to decorations.
http://photography.about.com/od/halloweenphotography/ss/HallowPhototips.htm
http://www.digital-photography-school.com/halloween-photography-tips
http://www.associatedcontent.com/article/2149521/ten_halloween_photography_tips.html
Journaling Opportunities
Now for the journaling...Besides the typical Who? What? When? Why? and Where? answers, try to make your Halloween journaling a little more interesting...here are some journaling prompts to get you started...
- Have a child describe how to carve a pumpkin...copy their answer down "word for word"
- Include the recipe for making baked pumpkin seeds
- Include recipes for other Halloween traditional treats or dishes
- Write a timeline for Halloween evening or day
- Explain how the Halloween costumes were chosen
- "Halloween by the numbers. I love "by the numbers" pages, where you track the statistics associated with a certain event. For Halloween, write down the number of houses you take your trick-or-treater to, how many blocks you walked, how much of each different types of candy was collected, etc. Take photos to match, and your page practically creates itself!"--Halloween By the Numbers Idea Quoted from http://ezinearticles.com/?expert=Lain_Ehmann
- Add a Halloween poem to your layout
- Add lyrics from a Halloween song
- Describe Halloween traditions
- 13 things you loved about Halloween
- Top 13 costumes you saw tonight
- Print out a short history of Halloween from the internet to include on your layout
Halloween Interview Questions for Children to Answer
Interview each child as soon as you are done Trick or Treating, the day's events will be fresh in their mind. Some questions to include could be...
What was your favorite part of Halloween?
What was the scariest part of Halloween?
What is your favorite treat or candy?
What do you think you want to be next year for Halloween?
I'm still brainstorming more interview questions, if you can think of any, leave a comment and I'll add the to the blog post!
Have fun with you Halloween layouts!!!
Friday, October 1, 2010
Free File Friday!!!
In honor of the first day of October...PUMPKINS!!! The link to the file below is a .GSD file and anyone with a Silhouette can download and cut it. Since there are some pretty small details, try not to cut it any smaller than the original file. I created it using "Trick or Treat 2.TTF" and "Nymphette.TTF" fonts/dingbats. Enjoy!!!


Subscribe to:
Posts (Atom)